Showing posts with label food. Show all posts

08 October 2015

Zucchini Casserole


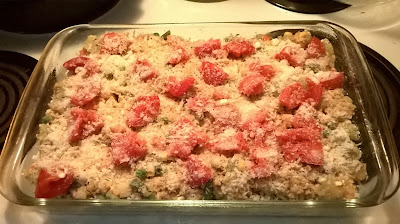
I made a zucchini casserole last night. It was fairly easy to do, I basically just chucked whatever veggies I could find and added them to the zucchini. I then added some feta, Parmesan, and some panko breadcrumbs. This is a good recipe to use if you want to empty out some veggies that you might not know what to do with.

photo of zucchini casserole

What you Need:
  • Zucchini, large
  • Veggies (you can use frozen or fresh)
  • Feta cheese
  • Parmesan cheese
  • Breadcrumbs
Putting it together: 

  • Take your zucchini and remove the skin
  • Remove the seeds. The easiest way to do this is to slice the zucchini lengthwise and use a large spoon to scarp out the seeds.
  • Cut the zucchini into bite-sized cubes
  • Steam the zucchini until tender (takes about 10-15 minutes)
  • Once cooled, in a large bowl add the zucchini and all the other ingredients, except the breadcrumbs
  • Add some salt, pepper, and any other herbs and spices you like
  • Mix together
  • Put everything into a 9 x 13 baking dish
  • Sprinkle top with breadcrumbs and extra cheese
  • Set oven to 350 and bake, uncovered, for 30 minutes
  • Enjoy!

07 August 2012

How to Peel and Pit an Avocado

This tutorial will show you how to quickly peel and pit an avocado. I know that there are many out there who might be intimidated by the prospect of trying to peel and pit an avocado, but don't worry, it's very easy to do. There are a few tricks that I will share, that will make you a pro in no time. So, enough talking, let's get down to business...

What you need:

photo of avocado, knife, and spoon
  • Avocado... Now there's a shock :)
  • Knife
  • Spoon

Peeling and Pitting your Avocado...

  • With the avocado facing lengthwise, place the knife in the center of the avocado and cut into it until you hit the seed
photo of cutting the avocado
  • Continue your cut around the entire avocado. Basically, you are using the seed as a pivot point for your knife, rotate your knife around the entire avocado
  • Once the avocado is cut, take a half in each hand and twist in opposite directions
photo of twisting the avocado

photo of avocado cut in half, before the seed/pit is removed
  • Very carefully, so as not to cut yourself, take your knife and wack the seed. This will cause the knife to lodge itself in the avocado seed
photo of the knife lodged in the avocado seed/pit
  • With the seed firmly attached to the knife, twist the knife
  • The seed should come easily out of the avocado
photo of the knife twisting the seed/pit

photo of the seed/pit removed from the avocado
  • Take a rag and remove the seed from your knife. These seeds are VERY slippery, so using a rag will help keep you from cutting yourself and from chasing the seed around your kitchen floor
  • With avocado halves on the cutting board, take your knife and score the flesh in one direction and then in the opposite direction. Make sure you cut all the way to the skin
photo of slicing the avocado flesh

photo of slicing the avocado flesh
  • You want to end up with square cuts
  • Repeat with the other half
  • Take a spoon and scoop out the flesh
photo of slicing the avocado flesh

photo of peeled and pitted avocado
  • ...And you are done!!

19 November 2011

Our Thanksgiving Day Menu 2011

Here is a list of the items we will be preparing for Thanksgiving. If you would like the recipes for any of these dishes (Each recipe comes with its own shopping list), please click the link and you will be taken to the appropriate page. If you have any questions on preparing any of the following recipes, please let me know in a comment.

Have a safe and Happy Thanksgiving!


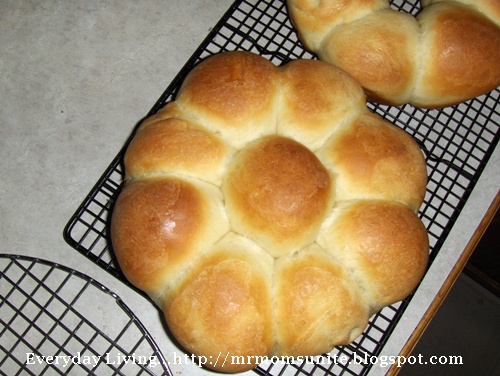
I decided to make rolls this year...

photo of rolls after they have baked

White Dinner Rolls


Appetizers...

photo of cheesy bread

Cheesy Bread


You've got to have potatoes...

photo of whipped potatoes

Whipped Potatoes


How about some gravy to go with those potatoes...

Lump-Free Thanksgiving Gravy


Yes, we are doing stuffing as well. I just sauté celery, onions and add the stuff from the box, so I don't have anything written-up on it.


...And still in his bag, the star of the show...

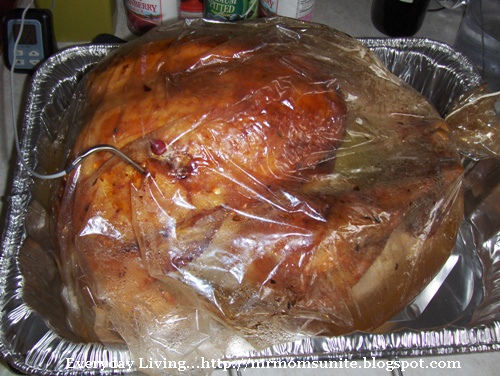
photo of turkey

Thanksgiving Turkey


Now, for dessert...


photo of cheesecake

Spiced Pumpkin Cheesecake


and finally...

Apple Pie with Crème Fraîche and Black Pepper


Happy Thanksgiving, everyone!!

19 February 2011

My Version of Papa Murphy's Garlic Sauce

I have to admit that I am a very big fan of Papa Murphy's pizza, but I can't always hop in a car and go get one. This being the case, I hunted around for a recipe that I could make at home, yet still tastes very close to the real thing...and by taking a few recipes and tweaking them, I think I found it! This recipe calls for using Ranch Dressing and I found that by making the dressing myself, I can come closer to the actual Papa Murphy's sauce.

Before I get to the recipe, let me tell you that the garlic used in this recipe gives the sauce a bite, but when heated, the flavor mellows very nicely. So, if you use this as a dip, expect a bite. Some other uses are: as a pizza sauce (duh!), cheesy bread, mix it in mashed potatoes, use instead of mayo to add a bite to your sandwich, or put a dab on your steak. Just use your imagination, you won't be sorry.

If you just want to use the ranch dressing portion of this recipe, just omit the minced garlic and the Parmesan cheese.

22 November 2010

Thanksgiving Turkey


photo of a cooked turkey


I figured that since many of us will be hitting the stores today or tomorrow, I would share my turkey recipe with you today, instead of waiting until tomorrow. The above photo was taken just after the turkey came out of the oven. You can see, that I like to cook it inside a bag. I find that this really helps keep-in the moisture.

I have been making our turkey using this recipe for the past several years. It comes out very moist and the flavoring from the oranges, various herbs, and the onions really boost the flavor. A few years ago, I was lazy and decided not to go to the extra trouble and do all of this. Well, right off the bat, everyone noticed the difference. So, I make it a point to go the extra mile. Oh, and on a positive note, in the many years I have made this, I have never had to drive someone to the ER :)


What you will need...

  • Turkey...any size, we usually get between 20-25 lbs.
  • Turkey bag...used in the baking process
  • Turkey Pan
  • Broiler Pan
  • Meat Thermometer (Example of the kind I use, is at bottom of page)
  • Flour...1 Tbsp
  • Compound Butter...Click here for recipe
  • Oranges...2-3
  • Onions...any leftover from other recipes
  • Celery...any leftover from other recipes
  • Herbs...any leftover from other recipes

19 November 2010

Spiced Pumpkin Cheesecake Recipe

My wife found this recipe while leafing through a magazine and wanted me to make it for a party she was having at her work. Well, I made it and it was a big success, so "The Boss" decided that we would add it to our Thanksgiving menu. This will be one of two desserts we will be making and I think it will be a great addition to the table.


What you need...


  • Ginger Snaps... About 38. When finely chopped, you should end up with about 1-½ cups

  • Pecans... ¼ cup; finely chopped

  • Butter (unsalted, please)... ¼ cup (which is 4 Tbsp), melted

  • Cream Cheese... 4 pkg. (8 oz. each), softened

  • Sugar... 1 cup

  • Pumpkin... 1 can (15 oz.)

  • Pumpkin pie spice... 1 Tbsp.(bulk recipe at end of page)

  • Vanilla... 1 tsp

  • Eggs... 4

  • 9-inch springform pan

  • Large baking pan that your springform pan can fit into

  • Parchment paper

18 November 2010

White Dinner Rolls


Photo of one pan of rolls after baking (using milk wash)...

photo of rolls after they have baked

Even though I am still working on this recipe (I'm taking several different recipes and trying to take the best from each one), the rolls that result from this recipe are extremely fluffy and soft. Over the past several weeks, I have been making this recipe and then freezing the result. Why? Well, my plan is to make these a few days in advance and then freeze them. On Thanksgiving (to save time), I will nuke them in the microwave and serve. In my test, I froze a batch for one week and then brought them in and let them thaw on the counter. I then nuked one for 10 seconds on high and tried it. The result was a slight depreciation in flavor, but the only reason I noticed it, was because I had tasted them fresh from the oven. You can make these fresh and serve or you can make them and freeze for later. I just wanted to point out that the freezing option is available.

Now, I've bored you enough, so on to the recipe...


What you need...

  • Yeast... 2 ½ tsp
  • Water... ½ cup (temperature roughly 105°)
  • Milk... 1 cup (scalded and then cooled to same temperature as water)
  • Bread flour... 3 ½ - 4 cups (amount will vary depending on humidity)
  • Eggs... 2
  • Butter (unsalted)... 4 Tbsp
  • Honey... 4 Tbsp
  • Salt... 1 - 1 ½ tsp
  • Cake pans or muffin pans if you prefer... 2


Putting it together...

17 November 2010

Making Ricotta Cheese

This is the third and final post that will deal with my Thanksgiving preparations. After this cheese is made, I will have all the custom ingredients needed to begin making my other recipes. This cheese will be used in making the manicotti and, if there is any left over, I may add some to a portion of the whipped potatoes.

Although, the idea of making ricotta cheese may seem intimidating at first, making this cheese is actually very easy. In addition, if you are a family that uses ricotta cheese a great deal, you will find that making it yourself will save you money. Next time you are in the store, price-out the cost for a gallon of milk and a bottle of vinegar (which you can use for several batches of cheese and other things as well) and compare it to the cost of a single container of ricotta cheese. You will be able to see how cost-effective it is to make yourself. As always, if you have any questions, please feel free to let me know and I will do my best to assist you.


What you need

  • One gallon of whole milk
  • Salt (I use Kosher salt)... ¼ - ½ tsp (depends on how salty you like your cheese)
  • White vinegar... 1/3 cup, plus 1 tsp
  • Thermometer
    Here's one like I use... Polder Classic Cooking Thermometer/Timer, Graphite
  • Cheese cloth
  • Large, non-reactive pot
  • Colander

13 November 2010

Our Thanksgiving Menu and Making Compound Butter

Wow, a compound title...

Okay, here's our Thanksgiving menu:

  • Dinner Rolls...I'm tweaking the recipe as I write this, so we will see how it turns out. Hey, I actually kept track of the measurements this time

  • Whipped Potatoes...there's a shock

  • Manicotti...Yes, something different and just because I won't have enough to do, I'll be making my own Ricotta cheese to use in it. I am currently trying to find a recipe for this, so if you have one, please let me know. As soon as I have made and tried a successful recipe, I will share it with you

05 October 2010

Large Meat and Sausage Stuffed Zucchini

My wife's friend gave her two HUGE zucchinis last week and I needed to try and find something to do with them. Granted, I could have resorted to the old zucchini cookies and bread routine, which I did a few weeks ago, but I wanted to try something different. Also, I am just too lazy to stand still for hours grating those behemoths. So, I did a little searching and combined a few recipes into one. Even though the proportions in this recipe are for large zucchinis, you can easily adapt it for smaller ones. You can also use this stuffing for peppers, tomatoes, or anything else you can think of.

20 July 2010

Making Italian Bread

Firstly, I would like to thank the following for giving me the inspiration to try this. You can find their complete recipes and more on their sites... cookography.com (there is also a handy diagram on how to fold the dough here) and amysbread.com

Okay, now let's have some fun...

Making a Biga

First off, I guess I should explain just what a Biga is. When making traditional Italian bread, the biga acts as a starter and is added to your regular dough recipe. It not only enhances the flavor, but it also affects the texture by giving the bread a lighter texture and giving it bigger holes (instead of the much smaller holes found in other breads). I need to note here that this is not a classic biga, which is taken from the unsalted dough of the bread you would have made previously and Thus can be a subject for another article.

10 July 2010

How to Make Soft Pretzels

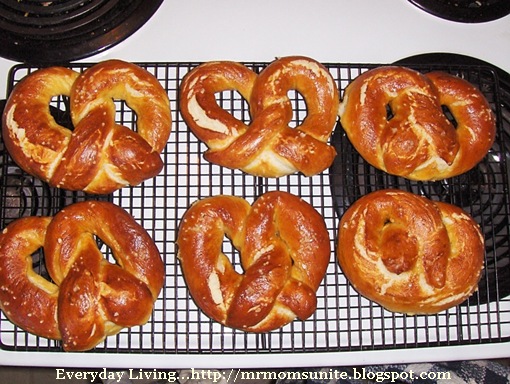
I have been experimenting with different pretzel recipes to try and get a pretzel that tastes like the kind we get in the mall and the following recipe seems to come pretty close. Although a majority of the recipe comes from Alton Brown, I did do a little tweaking to the salt and sugar ingredients (just click Alton's name to view the recipe as he wrote it). As you can see from the photo, I still need some practice folding the little guys.

photo of my pretzels

What you need
  • Active dry yeast...3tsp.
  • Water...1 ½ cups (110° to 115° F)
  • Brown sugar...1 Tbsp. (this substitution made all the difference)
  • Salt...2 tsp.
  • All-purpose flour...3 - 3 ½ cups
  • Butter...4 Tbs unsalted, melted
  • Water...10 cups (enough water to fill a big pot to be used to boil the pretzels)
  • Baking soda...2/3 cup (no, this is not a typo: it's cup)
  • Egg yolk...1 large, beaten with 1 tablespoon water
  • Pretzel salt (if you don't have pretzel salt, use any coarse salt you have on hand: Kosher or sea salt)

Putting it together
  1. In a mixing bowl add the yeast, brown sugar, and water. Let the yeast swim around and have fun for about 5 minutes. When it is foamy, they are ready to go
  2. Add a cup of flour, the melted butter, and salt. Stir to combine
  3. While mixing, begin adding the flour one cup at a time. This is a stiff dough, so when you test it, the dough will not stick to your fingers. Once you reach this desired consistency, continue kneading by hand until the dough is shiny (I don't want to risk over-mixing the dough with the machine)
  4. Place dough in a large, oiled bowl and cover with a towel. Leave in a warm location until doubled in size (about an hour)
  5. Once doubled, grab a large pot and fill with water (this is where the 8-10 cups of water come in)
  6. Add the baking soda and bring to a boil
  7. While the water is coming to a boil, remove the dough from the bowl and separate into 8 equal pieces
  8. Roll each piece into a ball and set aside
  9. On a floured surface, take one ball and roll it into a 18-20 inch long rope
  10. Taking each end, make into a U shape and loop one end around the other
  11. Place both ends in the middle of the U and press well to seal
    1. Better yet, avoid my badly worded instructions and view this great step-by-step instructional photo gallery at...The Kitchen You see, once again I didn't have the foresight to take my own pictures
  12. Repeat with the remaining balls of dough
  13. Pre-heat oven to 450°
  14. Once the water comes to a boil, place 1-2 pretzels (you don't want them touching each other) in the water and boil for 30 seconds
  15. Remove and place on a drying rack and repeat until all pretzels have had their bath
  16. Take your egg yolk solution and brush each pretzel
  17. Place pretzels on a parchment-lined baking sheet (or oiled baking sheet) and sprinkle with the Pretzel salt
  18. Bake for 12-14 minutes, until nicely browned (I check after 12 minutes and then recheck every minute or so)
  19. Remove and let cool for at least 5 minutes
  20. Enjoy

I have been asked by A Beautiful Mess to participate in my first Blog Hop. I hope you enjoy hopping around to these fine sites...

21 November 2008

Spinach and Artichoke Stuffing

Although this is titled as a stuffing, I present and serve this dish as a casserole. I must confess that I actually made this about 4 years ago. Although it looks complicated, it is fairly easy to put together. As to how it tastes...it disappeared within minutes and there were no leftovers.

What you will need...

* extra-virgin olive oil...1/4 cup
* spinach...2 1/2 pounds , washed (3 cups cooked and roughly chopped)
* yellow onions...2 cups chopped
* garlic...1 Tbsp roughly chopped
* Emeril's Italian Essence (recipe here), or other Italian Seasoning blend...1 Tbsp plus 2 tsp
* salt...2 1/2 tsp
* black pepper...1 1/4 tsp freshly ground
* artichoke hearts...3 (8 1/2-ounce) cans quartered , any tough outer leaves removed
* eggs...2 large
* heavy cream...1 1/2 cups
* chicken stock...2 cups
* lemon juice...2 Tbsp
* French bread...12 to 14 cups cubed (1-inch) day-old (1 loaf)
* Brie...1 pound , rind removed and cut into 1/2-inch cubes
* Parmesan...1/2 cup freshly grated
* parsley leaves...1/4 cup minced fresh


Putting It Together

  • Preheat the oven to 350 degrees F. Grease a 9 by 13-inch baking dish with 1 tablespoon olive oil.

  • Bring a medium pot of water to a boil. Add the spinach and cook until just wilted, about 30 seconds. Drain and rinse with cold water. Once cool, squeeze as much water from spinach as possible, then roughly chop, and reserve.

  • Heat 1 tablespoon olive oil in a large skillet over medium-high heat. Add the onions and cook until golden brown and tender, about 5 minutes.

  • Add the garlic, 2 teaspoons of Italian Essence, 1/2 teaspoon salt, and 1/4 teaspoon pepper, and cook, stirring, until the garlic is fragrant, about 30 seconds.

  • Add the artichokes and cook, stirring, another 2 minutes. Remove from the heat and reserve.

  • Combine the eggs, cream, chicken stock, lemon juice, remaining 1 tablespoon Italian Essence, remaining 2 teaspoons salt, and remaining 1 teaspoon pepper in a large bowl.

  • Whisk to combine.

  • Add the bread, spinach, artichoke mixture, brie, 1/4 cup Parmesan, and parsley and stir to combine.

  • If bread does not absorb all of liquid immediately then let rest until this happens, about 20 minutes.

  • Pour the bread pudding mixture into the prepared dish. Sprinkle remaining 1/4 cup Parmesan over the top and drizzle with remaining 2 tablespoons olive oil.

  • Bake until firm in the center and golden brown, about 1 hour. Serve warm.

TIPS...To make it easier to trim the rind from the Brie, wrap the Brie in foil and place it in the freezer for about an hour. This will firm it up and make rind-extraction much easier. Also, I will be substituting the French Bread with Sour Dough bread (I love sour dough).

Photo courtesy of...Food Network

Emeril's Italian Essence

What you will need...

* paprika...2 1/2 Tbsp
* salt...2 Tbsp
* garlic powder...2 Tbsp
* black pepper...1 Tbsp
* onion powder...1 Tbsp
* cayenne pepper...1 Tbsp
* dried leaf oregano...1 Tbsp
* dried thyme...1 Tbsp

Putting It Together

  • Combine all ingredients thoroughly and store in an airtight jar or container.


This is a good seasoning for just about any dish.

Recipes courtesy of... Emeril Lagasse, Food Network

17 November 2008

Thanksgiving Countdown

photo of Koko laying amongst some toysAs you are all aware, Thanksgiving is fast approaching. As many of us will be traveling to be with our families, there will be some who must stay behind and act as host: I am one of these people. Yes, my wife and I will be hosting Thanksgiving for the 11th year. I am estimating that around 20 of her family (all of my family is hundreds of miles away) will be descending upon our humble home and for the next 8 hours, chaos will reign supreme.

Now, I am not saying that I dislike hosting Thanksgiving, in fact I enjoy it. I look upon it as a challenge in logistics and a test of my cooking skills. The only part I have a problem with is when people start to come into MY kitchen and get in the way. Other than that, I actually have fun. My responsibility is the turkey, whipped potatoes, one side dish (I try to come up with a new side dish to try each year and this year it is going to be a spinach and artichoke casserole), and two pies. I say my responsibility, because I want my wife to be able to spend as much time with her family as possible, so I do all the cooking and baking (except for one pie that my wife bakes).

Why am I telling you all this, besides having the opportunity to post a new article? Well, over the next several days, I will be sharing some of the recipes I will be using and I'll also tell you how I go about preparing the guest of honor...the turkey. Now, to start things off, let me give you my actual Thanksgiving Shopping List (as of this writing) for this year...

Turkey
Potatoes...10 lbs.
Granny Smith Apples...2.5 lbs.
Pumpkin...
Jellied Cranberries...2 cans
Olives...2 cans
Stuffing Mix...3 boxes
Vegetable Broth...3 boxes
Cream Cheese
Heavy Cream
Buttermilk
Smoked Gouda...1 lb
Fresh Parsley
Grated Parmesan
Brie...1 lb.
day-old French bread...1 loaf
Chicken Stock
Lemon Juice
Artichoke Hearts...3 (8 1/2-ounce) cans
Extra-Virgin Olive Oil
Spinach...2 1/2 pounds
Yellow Onions
Garlic...1 bulb
Dry White Wine...1/4 cup (optional)
Oranges...2-3
Celery
Carrots
Lime Juice
Brandy

08 October 2008

Hittin' the Sauce

photo of a kitten ruining a photo op.As I was checking my comments today, I noticed that several people (okay, 3) commented that they were wondering, "what about spaghetti sauce?" Well, I am here to tell you that spaghetti sauce is next on my hit-list.

We have between 40 and 50+ tomatoes that will be coming ripe by the weekend so, I have chosen Saturday as the day when I will make a huge batch of spaghetti sauce. You are probably asking yourself why you should care. However, this is the catch: I don't have any recipes that I want to use. When it comes to Alfredo Sauce, I have no problems and I can whip it up rather quickly. But when it comes to spaghetti sauce, I must say that I am stumped.

My last attempt did not go very well, mainly because the sauce came out tasting too acidic (yes, I should have added sugar) and the flavors were off. What I would like to do is ask any of you if you have any favorite recipes you would be willing to share. I plan on placing the sauce in quart-sized jars and freezing them. Since I am working on a scale which is larger then the usual recipe, just a list of ingredients would be fine and I can combine the ingredients to taste.

Also, I have noticed quite a few recipes which include hamburger and Italian sausage. Question: Since I am freezing the sauce, is it still alright to include the meat or should that be added at the time of service? Thanks for your help.

30 September 2008

This Takes the Cake

photo of Koko in the cabinetLast Thursday, my wife "asked" me to make a cake for a birthday party she was hosting at her work. Since the recipient of the party happens to a Director at the hospital, the cake needs to be good. Last year I made a Tiramisu, which happened to go very well, thank you very much. This year, she wanted me to make a Chocolate Torte with Apricot Filling. Not a problem, but the recipe she gave me was not written with the correct proportions. Since I did not have the time to work them out myself, I tried to find something else that would be just as good. I ended-up taking parts of three different recipes and combining them into something I am calling Chocolate Fudge Cake with Cream Cheese, Apricot Filling, and Chocolate Glaze. I gave this recipe a test-run this weekend and it turned-out very good. The photo below, shows the cake I made on Saturday, because I was too stupid to take a picture of the one I made for the party. Sorry, I am not the best photographer. My wife just told me that the cake was a hit; there was nothing left to bring home.
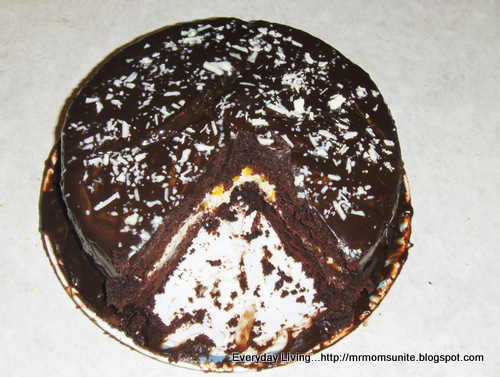

photo of the Chocolate Fudge Cake with Cream Cheese cake


Chocolate Fudge Cake with Cream Cheese, Apricot Filling, and Chocolate Glaze

Da Cake Ingredients
1 ¾ cups of All-Purpose Flour
1-cup less 1TBS of Cocoa Powder
1 ¼ tsp Baking Soda
1/8 tsp Salt
3/4 cup (1 ½ sticks) Unsalted Butter (softened)
2/3 cups Granulated Sugar
2/3 cups firmly packed Brown Sugar
2 Large Eggs
2 tsp Vanilla
1 ½ cups Buttermilk

  • preheat oven to 350 degrees and line the bottoms of 2-9" cake pans with parchment paper and grease and dust the sides with flour

  • Mix flour, cocoa, baking soda, and salt in a bowl and set aside

  • In another bowl mix the butter, granulated sugar, brown sugar at medium speed until light and fluffy (about 5 minutes)


    • This is a very important part, because during the mixing, the sugar is tearing tiny holes in the butter (creating air pockets), which allows the cake to become lighter and less dense.

  • Add the eggs, one at a time. Mixing well after each addition


    • Tip: to avoid the unwanted egg shells in your mix, first break the eggs into a bowl and use that for your addition.

  • Add vanilla

  • At low speed, alternately add the dry mixture and the buttermilk into the butter mixture. Mix only till combined. Do not over mix

  • Divide the batter evenly into both pans

  • Bake 25-30 minutes or until a toothpick inserted into the center comes out clean.

  • Place cakes on a cooling rack and let cool for 10 minutes

  • Turn-out cakes onto racks, remove paper, and place cakes upside-down to cool
    completely

Hey, guess what, you're 1/3 of the way there!!

Da Filling Ingredients
6 Ounces of Cream Cheese (softened)
1/2 cup Granulated Sugar
2 TBS Grated Lemon Peel (about 4 lemons) (careful and avoid the white pith...tis bitter)
1 TBS Lemon juice
1 TBS water (for you science types that's H20)
1/3-2/3 cups of Apricot Preserves

  • In a bowl, place the cream cheese, lemon peel, lemon juice, and water.

  • Mix well, until thoroughly combined

Go Team, Go...

Da Construction

  • If you desire a clean serving plate (this was learned the hard way, as seen in the picture below), take strips of wax paper and slide them under your cake; completely covering the edges of your serving dish

  • Take the largest of your two cakes and, with it still upside down, place on serving platter and spread the apricot preserves on it

  • Spread the filling over the apricot preserves

  • Take the other cake and flip right-side up

  • Trim the top to flatten

  • Spread some additional apricot preserves on the top and then flip over and place on the bottom cake

  • Trim the sides, if the cakes are uneven

Hey, You're almost there...

Da Glaze Ingredients
2/3 cup of Heavy Cream
6 ounces (squares) Semisweet chocolate (coarsely chopped)
2 TBS Unsalted Butter
2 TBS Light Corn Syrup
2 ounces White Chocolate baking squares, shaved (optional)

  • Put everything into a pan

  • Over medium heat, stir constantly until mixture comes to a boil

  • Remove from heat and stir for an additional 1-2 minutes, until glaze thickens

  • Slowly pour the glaze over your cake and smooth

  • If desired take the white chocolate shavings and sprinkle over the top of the cake
I hope you enjoy your cake

Shopping List for Entire Recipe
1 ¾ Cups Flour
1 Cup Unsweetened Chocolate
1 ¼ tsp Baking Soda
1/8 tsp Salt
2 Sticks Unsalted Butter
2 Cups Granulated Sugar
2/3 Cups Brown Sugar
2 Large Eggs
1 ½ Cups Butter Milk
2 tsp Vanilla
1/2 Pint Heavy Cream
6 Ounces (squares) Semisweet Chocolate
2 Ounces (squares) White Chocolate baking squares (optional)
2 TBS Light Corn Syrup
6 Ounces Cream Cheese
5 Lemons
1-15.5 Ounce Jar of Apricot Preserves
25 August 2008

Do the Salsa

picture of a pouting cat sitting on a couchThis past week, our tomato plants just went wild and we ended-up with about 60 ripe tomatoes. Now, in addition to adding tomatoes to hamburgers, sandwiches, and creating my famous Tuna-Stuffed-Tomato, I had to find something to do with them all. Naturally, we shared some with the neighbors, but my wife had other ideas…Salsa.

Using her feminine wiles and various threats, she told me that she wanted me to make salsa. Well, given the fact that I misplaced the recipe I usually used (actually, it was bits and pieces from several recipes that I used), this was going to be a challenge. Thankfully, I remembered the main ingredients; I just forgot the proportions. Since it turned-out very well, if I do say so myself, I will bore you with the recipe. This will serve me in two ways: First, I will have something to post and Second, I will be able to find the recipe the next time I make it.

Stuff you will need:

  • Tomatoes (duh)

  • Green onions…4-5 bunches

  • Chilies, fire roasted…6- 6 oz. cans. We used mild, but if you like yours hotter, than get medium to hot, or mix and match.

  • Pickling Salt…1-1 ½ Tablespoons

  • White Wine Vinegar…1 cup


Next time: If you decide to Can…

See also...
Do the Salsa:Part-2

Do the Salsa:Part-3

12 May 2008

Scale Down

2 girls looking at a scale
I am going to throw this scale right through the window. I ask you, how can I step on the scale and weigh 233 lbs and then step on again and weigh 240lbs? I mean, I’ve heard of looking at a hamburger and gaining 5 pounds, but I didn’t know that it was true.

Don’t get me wrong, dieting is tough and not a lot of fun. There is a plethora of food out there that I can’t have anymore, but to be penalized for just THINKING about it, is just too much. I’m getting to the point where I might just resort to going on the Beverly Hills diet…liposuction. Naw, that diet sucks.

What I want is a nice juicy steak. Throw a nice New York Strip on the Barbie and cook it to medium rare doneness. Yes, I like to have it mooing. It’s cooked just enough to kill-off most of the nasties, but still retains a lot of its flavor. Make a nice pan sauce to go over it, and I’m all set. Oh yea, I need to add French fries to that. Am I a connoisseur or what?

Now my wife likes to have her steak cooked well-done. Why not just get some beef jerky and be done with it. The only way you’ll have any flavor is to smoother it with A-1 sauce…..Yum. I say let’s just skip the middleman and pour some A-1 in a cup and have at it.

This is just torture. Sniff, sniff. I want FOOD! I have a stupid scale, excuse me, HAD a stupid scale that magically adds pounds and a dream of steak. Oh, I just thought of something: Fish and Chips. Get some malt vinegar and some salt…….I’ve got to stop. I am going to go on EBay and get a new scale. I think a nice analog job will cut the mustard. Mustard, put that on a pretzel and…Oh man this has got to stop….bye.
Cartoon courtesy of: http://humor-in-photos-and-pictures.blogspot.com/


05 April 2008

Potatoes Gone Wild

photo of eggs being added to the German potato salad

Thanks for stopping by,
This post has re-written WITH PICTURES as German Potato Salad. Please click through and let me know how your salad turns out. I'm sure you and everyone who tries it will love it :-)
Related Posts Plugin for WordPress, Blogger...

Google Analytics